Creating a 3D Scene with the 3D Picture Control

Complete the following steps to create a 3D scene using the 3D Picture Control VIs and the SceneObject methods.

  1. Add a 3D picture control to the front panel window.

     Add  Find
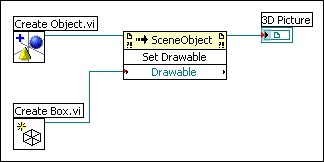
  2. Add the Create Object VI to the block diagram to the left of the 3D picture control terminal.

     Add  Find
  3. Right-click the Scene:New Object output of the Create Object VI and select Create»Method for SceneObject Class»Set Drawable from the shortcut menu to create the Set Drawable method.
  4. Add the Set Drawable method to the block diagram to the right of the Create Object VI.
  5. Wire the Scene:New Object output of the Create Object VI to the reference input of the Set Drawable method.
  6. Select any VI from the Geometries palette and add it to the block diagram to the left of the Set Drawable method.
Note  If you use the Create Mesh VI, you must use the Set Mesh Parameters method to configure the mesh.
  1. Wire the reference output of the VI you added in step 5 to the Drawable input of the Set Drawable method.
  2. Wire the reference output of the Set Drawable method to the 3D picture control terminal. The following block diagram shows a simple 3D scene.

  3. Wire error in and error out terminals on the block diagram.
  4. Run the VI to generate the 3D scene.
  5. (Optional) Configure a camera to view the 3D scene from different perspectives.

After you create a basic 3D scene, you can use other 3D Picture Control VIs to enhance the 3D scene. You can add additional 3D objects and create object relationships, apply textures to 3D objects, and configure light sources for the 3D scene.

You also can configure a scene window to display and render the 3D scene.

Refer to the 3D Model of Solar System VI in the labview\examples\Graphics and Sound\3D Picture Control directory for an example of a 3D scene.

 Open example  Find related examples