Tutorial: Adding an Object to a VI Using VI Scripting
You can add objects to the front panel and block diagram of VIs using VI Scripting. This tutorial adds an object to the block diagram. Complete the following steps to add an object to a VI using VI Scripting.
Note
This topic assumes familiarity with the VI Scripting introduction.
You must enable VI Scripting to display the VI Scripting VI and functions and use the associated properties and methods.
Complete the previous exercise if you have not already completed it. If the untitled VI you created in the previous exercise is still open, close the VI.
Remove the wires from the Close Reference function and move the function to the right to make room on the block diagram.
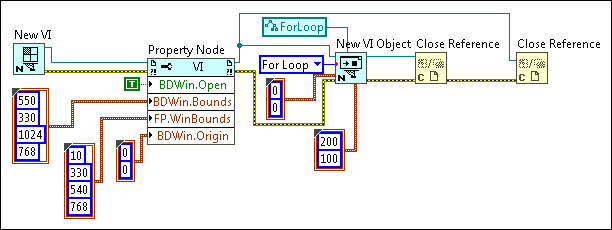
Add the Block Diagram Window: Origin property to the Property Node and create a constant with Horizontal and Vertical input values of 0.
This configuration sets the horizontal and vertical coordinates in the upper left-hand corner of the block diagram. Later in the exercise, you set the location of a For Loop so it also appears in the upper left-hand corner.
Add the New VI Object function to the right of the Property Node.
Add Find
Wire the reference out output of the Property Node to the owner refnum input of the New VI Object function.
Right-click the vi object class input of the New VI Object function and select Create»Constant from the shortcut menu to create a class specifier constant.
Click the class specifier constant and select Generic»GObject»Node»Structure»Loop»ForLoop from the shortcut menu.
Note In this exercise, you add a For Loop to the block diagram. However, with knowledge of the appropriate references, you can add and manipulate any front panel or block diagram object.
Right-click the style input of the New VI Object function, select Create»Constant from the shortcut menu, and select For Loop from the pull-down menu of the constant.
Right-click the location input of the New VI Object function, select Create»Constant from the shortcut menu, and enter 0 as the value for the Horizontal and Vertical inputs.
This step specifies the coordinates of the location on the block diagram where you want the new object to appear.
Right-click the bounds input of the New VI Object function, select Create»Constant from the shortcut menu, and enter 200 and 100 for the Width and Height inputs, respectively.
This step specifies the size of the For Loop.
Add another Close Reference function to the right of the existing Close Reference function. Closing both the reference to the VI and the reference to the For Loop ensures no memory leaks. Because the VI is the containing object of the For Loop, make sure to close the reference to the VI after you close the reference to the For Loop.
Add Find
Complete all wiring to match the following block diagram.
LabVIEW creates and opens untitled front panel and block diagram windows. The block diagram contains a For Loop in the upper left-hand corner.
Additional Options for Creating Object References
Consider the following additional options to create references to objects:
Add a custom object to the front panel or block diagram by wiring a path for the custom object to the New VI Object function, or use the Create from Reference method.
Use the To More Specific Class function to convert a generic object reference to a more specific reference, like a control. You then can use the properties of the more specific reference type.

 Add
Add
 Find
Find