Handling Errors Using Case Structures

Complete the following steps to handle errors using Case structures.

  1. Select an error cluster terminal.
  2. Wire an error cluster to the selector terminal of a Case structure. The case selector label displays two cases—Error and No Error—and the border of the Case structure changes color—red for Error and green for No Error. The Case structure executes the Error subdiagram for all errors.
  3. (Optional) To configure the case structure to execute a specific subdiagram for specific errors or list of errors, add more cases and enter error values or ranges in the selector labels. You can also add error values to the No Error case. The border of the No Error case is both green and red when the selector label includes any error codes.

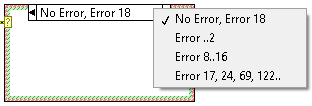
    Note  If you add more error cases without customizing the selector label of the Error case, the Error case changes to Default, which handles all the remaining errors that are not covered in existing error cases.
  4. (Optional) Configure the display format of the error codes in the selector label by right-clicking the structure border and selecting Radix. If the display format is not decimal, a glyph representing the format appears on the left side of the selector label.
  5. Add code to the error case(s) to define behaviors for different cases.